
How to Make Cords
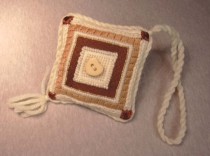 Scissor's Charm
Often a project will look unfinished unless it has something at the knifed edge. This may be the situation for pillows or scissor's charms. You can always buy cording, but it is also simple to make. It can add appeal to a project, especially in a color to set off the work. To tie in the color scheme with your needlepoint, you may wish to use one or more shades in the cording.
The number of strands to use to make the cording should be determined by the weight of the thread or yarn used to stitch the project. For a project stitched in Persian yarn, I would recommend six or eight strands in the cording. The instructions for the scissor's charm show tapestry yarn used. Five long strands were used for the cord.
To figure how much thread you will need, measure the perimeter of the project. If your pillow is twelve inches by twelve inches, the total is 48 inches. Then, multiply this number by three, to equal in this case 144 inches. Add a couple of inches for waste, and you arrive at the length of thread needed for each double strand. For example, if you are using tapestry yarn, and you want a four-ply cord, then you need two lengths of 152 yarn.
Make a Cord
To make a cord, you need:
Thread or yarn
Hand drill
Cup hook
Scissors
Helpful friend
1. Cut the length of thread you need for the project, as figured above.
2. Have a friend hold the two ends while you loop the thread on a cup hook which is inside the drill.
3. Stand back at a distance from the hook, to tighten the thread between you and your friend.

4. Twist the thread with the hand drill. Continue twisting until the thread starts to kink.
5. Give the friend your drill, taking care not to tangle the thread. Hold the middle of the twisted thread.
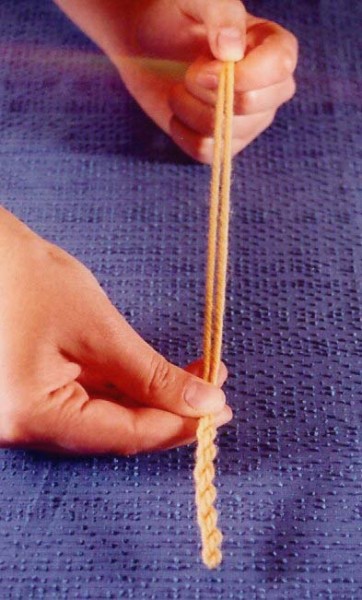
6. Slowly twist the middle in the direction the thread wished to go. Continue doing so until the entire length of thread has twisted around itself. Tie the ends together to ensure the yarn will not become untwisted. It is now ready to be sewn onto the needlepoint project.
To attach the cord, make small whip stitches in a matching shade of thread, if you do not want the stitching to show.
When the Scissor's Charm was created, all four sides were measured, and thirteen extra inches was included for the loop. An extra length was added for the tassel at the bottom corner. After I made the cord, I used small whip stitches to attach it to the charm, allowing extra cording at the bottom corner, where the cord started and stopped. This finished the charm, and made the cording appear as a single, continuous line.


