
Turkey Stitch
AKA: Cut Turkey
Ghiordes knot
Turkey Rug Knot
 Getting Harder
Uses: Hair, Foliage, Birds, Animals, Fuzzy things

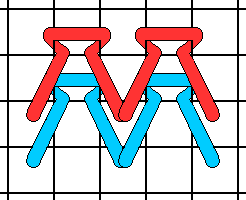
To work, start at the lower left hand corner of the area in which you would like to insert Turkey. For the first stitch, start on the top of the canvas. Insert your needle down at 1 and up at 2. Go back down to the underside at 3 and up again at 4. Notice the first and last movements of the needle will be in the same canvas hole. (1 and 4) The second stitch will be down at A, up at B, back down at C and return to the top at D. Please notice, you will share the same canvas hole for both stitches. (3 and B) Continue to work the row in this fashion. Finish the row and cut the thread. The second row will be the next canvas row above the one in which you had just stitched. Like row 1, work from left to right.
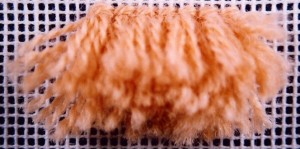
When the entire area has been filled, take a pair of scissors and snip the loops. You can cut very closely to the canvas without risking the stitches coming out. Taper the edges for a clean curve.
If you would like to make Looped Turkey Work, use a knitting needle or other rod. Continue to work Turkey but do not cut the loops with the exception of the very first and last tail. Work from bottom to top of the motif and left to right.
Did you notice each Turkey stitch requires 2 canvas threads? If you have reached the end of the row and you have an extra canvas thread, if you are working Cut Turkey, cut the thread tail a little longer to cover the area. (Work the surrounding area like usual but adding an extra stitch into the empty space.) If Turkey is looped, again omit the last thread or add as neededl
Turkey stitch can be as exciting as your imagination will take you. Think of this this stitch for hair, "fuzzy" hats, animals or ear muffs. Flower centers, mini rugs, insects and English Palace guards hats are also areas in which you can use Turkey.


