
Tool or Mouse Pad

To complete this project, you will need the following tools and materials:
13" X 12" 14/1 Canvas (interlock is best)
12 Strands J. L. Walsh #223 silk
12 Strands J. L. Walsh #212 silk
12 Strands J. L. Walsh silk/wool
Seed beads
Clear drying, flexible glue
Scissors
12" X 13" Stretcher bars
Thumbtacks
Pencil
Masking tape
Fabric paint
1. Bind the canvas edges with masking tape.
2. Mount the canvas on stretcher bars using thumbtacks.
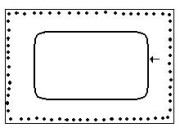
3. Lay the mouse pad on top of the canvas, Use a pencil to mark an outline around the pad. (arrow on illustration)
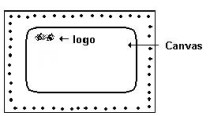
4. Compare the mouse pad and canvas and determine where any lettering and/or picture needs to be hidden on the pad.
 Details of Stitching

5. If you wish, paint the canvas before stitching.
6. When the paint is dry, stitch flowers and leaves using Detached Chain, Bullion Knot, French Knot and other stitches to the areas you would like covered on the mouse pad. Stitch beads onto the pad for accents. Be sure to cover the areas of the mouse pad that need to be hidden.
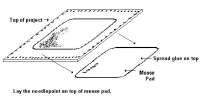
7. Apply a generous layer of clear drying, flexible glue to the entire top of the mouse pad.
8. Using the pencil lines for reference, lay the needlpoint on top of the pad. Be sure the needlepoint is not facing the mouse pad.

9. Let the project dry. It is best to lay the project face down, with books on top. To keep the stitches from flattening, prop the edges on the stretcher bars on a baking dish or similar item.
10. After the glue has set, remove the project from the stretcher bars. Trim the canvas close to the edge of the mouse pad.
11. Glue braiding on the sides to hide the raw edge of the pad. If you like, attach a tassel on a corner.


